Showing posts with label Blogger Tricks. Show all posts

Sunday, 23 July 2017

7 Steps To Make A Boring Blog Interesting

7 steps to make a boring blog interesting

Writing articles on social issues or current affairs may seem like a difficult task, but once you begin writing, you will know that it is not that difficult.
Here are a few things to keep in mind before you begin writing.
COLLECT ALL DETAILS
First and foremost step of any story or topic is to find out all the important details of your chosen topic. Unless you are clear about each and every detail of the incident, you will not be able to convey your message properly.
DOUBLE CHECK YOUR FACTS
If you choose a topic that requires you to write down some specific dates and numbers, then you need to ensure that all your numbers are correct.
DATES AND TIMELINE
Adding a paragraph on the background of the story adds to the quality of articles. Always follow a chronological pattern. Dates play a crucial role when it comes to important court cases and their verdicts. These cases directly impact our society.
SHOULD NOT BE BIASED
Another important point that every blogger should keep in mind while writing is that he/she can have an opinion but it should not be a biased in nature.
SHOULD NOT BE SENSITIVE OR COMMUNAL
Every great writer should know his or her boundaries. They should know where they need to stop when writing on religious or political topics that are sensitive in nature and can harm other people’s sentiments.
CHOOSING THE RIGHT IMAGE
Choosing the right image for your article is as important as the content and headline of the article.
  • A relevant image is the one that goes well with the article’s content.
  • One should use a representative image of the original image is – sensitive, vulgar, bloody etc.
  • Always mention image credit/source at the end of the article.
HEADLINE AND WORD LIMIT
A blogger must ensure that the headline used for an article is not very sensational or fake. A good and catchy headline always works, but it should stick to facts and reality.
Ideally, a good article should be within 300 - 800 words. It should convey the message in a sharp and crisp manner.
Image source: Google images

5 Tips On How To Make Less Mistakes In Your Blog

1. Always make a rough copy first
Image Source: Google
To make fewer mistakes in your blog, you must always make a rough copy of the article before publishing it. This helps you to edit or re-edit the content before you actually publish it. You can even spot the mistakes, if any, in the article before submission.
2. Double check before publishing
Image Source: Google
You must go through your blog twice before finalizing it. This not only reduces the chances of mistakes but also gives you a chance to add or subtract any other element in the article.
Language, grammar, format and spacing problems can be solved too by double-checking your article.
3. Use spell check software
Image Source: Google
There are several software available online that help you check your spellings and grammar. You can download any such software to improve your blog. This way, there will be no spelling mistakes in your blog, which is the first and basic requirement of any good article.
4. Research on your content
Image Source: Google
One key point for every blogger is to do some good research on the topic before you start writing on it. You can easily write on all the aspects of the chosen theme after researching on it. This gives you an idea on how to write a blog with different perspectives.
5. Follow one format
Image Source: Google
It is very important to follow a similar format throughout your article. Using different fonts, sizes or colors may sometimes make your blog look rough, unattractive and unedited.
Sticking to a simple format increases the authenticity of the blog. Any article written in a proper format is easy to read and understand.

Saturday, 15 July 2017

How to Place Ads Inline With Text in Google AdSense Ads (Blogger,Wordpress)

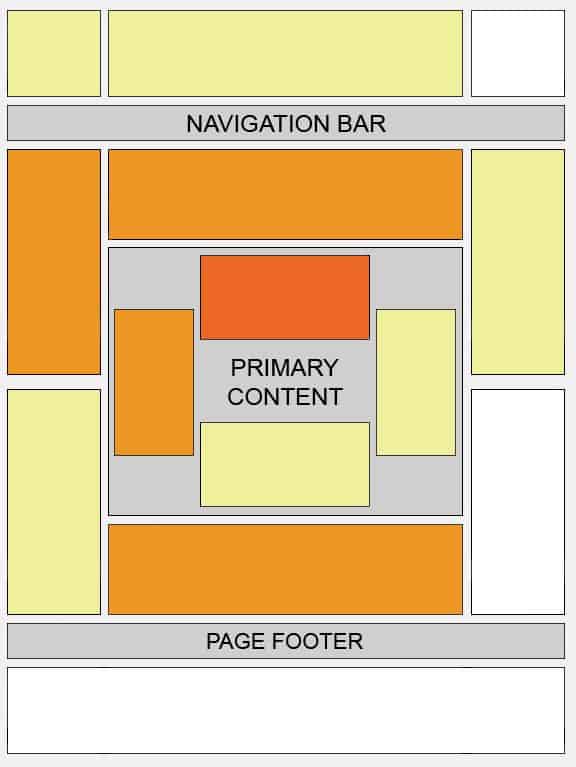
The positioning of ad units is crucial if your business model involves building up a content-based site and monetizing it with ads. According to Google, the best place for ads is floating inside the primary content area of the page. Your site's visitor will most likely look in this location anyway, and will, therefore, have a greater chance of being exposed to your ads. You can achieve this positioning with some HTML coding.
Image result for How to Place Ads Inline With Text in Google AdSense Ads
1. Log in to AdSense at adsense.google.com (full link in Resources). Click “My ads” from the main menu bar at the top, then click the “Get code” link beneath the title of the ad you want to insert. Copy all of the code in the “Ad code” text box.
2. Open the HTML file for the Web page to which you'll be inserting the ads. If you use a content management system like WordPress or Drupal, log in and open the relevant template file.
3. Paste your ad code into the file at the point you want the ads to go. For example, if you want them to be right at the top of the article, paste the code in the line directly above the first line of text.
4. Surround the ad code with divider tags with the ID “inline ads.” The result should look like this: <div id=”inline ads”> Your Google ad code here </div> Save the file.
5. Load your CSS file, then scroll to the bottom of the file and add the following on a new line: #inlineads { margin:5px; float: left; } This floats the ads to the left of the content; change this to “right” if you prefer. Add any other styling you require to this section, such as a border. The “padding” element is used to create a space between the ads and the text; edit this as you see fit to make a larger or smaller gap. Save the file when you're finished editing the code. Your ad unit is now displayed with the text wrapped around it.

Wednesday, 21 June 2017

How To Add Total Page View Widget On Blogger Website

The steps below helps you to insert a viewer/hit counter on your Blogspot/Blogger and helps you keep track of your visitors.
Follow Steps

1)     First, open Blogger.com 
2)     Click On  Layout > Add a Gadget ( Where You Want To Show Total Pageviews Of Your Blogger Website)
3)     Choose HTML/JavaScript 
4)     Type Pageviews In Title Box, Copy below Code and paste in content


<b:widget id='Stats1' locked='false' title='Total Pageviews' type='Stats'>
      <b:widget-settings>
Click Save  

How To Add Social Media Follow us Buttons On Blogger Website

Google's Blogger Blogging Platform Lets You Customize Your Blog By Adding Widgets To Your Profile. These Widgets Range From Calendars And Other Tools To Profile Badges For Your Social Networks. If You Want To Add A Facebook Profile Badge To Your Blogger Profile, You Can Do So Directly Through The Facebook Badges Website.

Add Social Media Follow Us Buttons On Blogger Website
Follow Steps

1)     First open Blogger.com 
2)     Click On  Layout > Add a Gadget ( Where You Want To Show Social Media Buttons)
3)     Choose HTML/JavaScript 
4)     Type Follow Us In Title Box, Copy below Code and paste in content
<div class="kt-social-buttons-widget"><ul class="sidebar-social clearfix"><li><a href="https://twitter.com/Durgeshjangid9" class="social-btn-twitter">Follow on Twitter <i class="fa fa-twitter"></i> </a></li><li><a href="https://www.facebook.com/trickzbuzzz /" class="social-btn-facebook">Like on Facebook <i class="fa fa-facebook"></i> </a></li><li><a href="https://www.youtube.com/c/trickzmaster" class="social-btn-youtube">Subscribe on Youtube <i class="fa fa-youtube"></i> </a></li><li><a href="https://www.instagram.com/durgesh0496/" class="social-btn-instagram">Follow on Instagram <i class="fa fa-instagram"></i> </a></li></ul></div><style>.kt-social-buttons-widget ul {list-style: none;padding-left: 0;}.kt-social-buttons-widget li a {font-size: 10px;text-transform: uppercase;letter-spacing: 2px;text-decoration: none;display: block;color: #0a0a0a;padding: 10px 1px 10px 10px;background:#f8f8f8;}.kt-social-buttons-widget ul li {width: 100%;margin-bottom: 10px;}.kt-social-buttons-widget li:hover a.social-btn-twitter {background: #1da1f2;color:#fff;}.kt-social-buttons-widget li a i {float: right;width: 35px;height: 14px;line-height: 14px;text-align: ;margin: 0;padding: 0 0 0 10px;font-size: 14px;}.kt-social-buttons-widget li a i {border-left: 1px solid #666;line-height: 14px;}.kt-social-buttons-widget li:hover a.social-btn-facebook {background: #3b5998;color:#fff;}.kt-social-buttons-widget li:hover a.social-btn-youtube {background: #cd201f;color:#fff;}.kt-social-buttons-widget li:hover a.social-btn-instagram {background: #405de6;color:#fff;}</style>

Note: - Ã˜  Replace Twitter Username Durgeshjangid9

    Ø  Replace Facebook Page Username trickzbuzzz
    Ø  Replace YouTube Username trickzmaster
    Ø  Replace Instagram Username  durgesh0496

Then Click Save 

Tuesday, 20 June 2017

How To Place Adsense Ads In Middle of The Post in Blogger-Any Template Work

Placing adsense ads in middle of all the posts will give a high CTR which eventually increases earnings. In word press, There are customized plugins available for placing ads in middle of the posts. But in case of blogger it is some what tricky part to place adsense ads in middle of all the posts. We have developed a script which can place adsense ads in between the post exactly in the middle of the content. The procedure for placing adsense ads in middle of  the posts in blogger is shared below.
Image result for how to insert adsense ads in blogger post

Place Adsense Ads Automatically In Middle of All The Posts In Blogger:

Follow The below process to place adsense ads in Middle of all the posts automatically in blogger.

Step 1:

Login to Your Blogger Account
Go to Template >Edit HTML

Step 2:

Search For Below Code in your template.
<data:post.body/>
You will get multiple codes similar to above code. You have to select the second code which is similar to above code in order to make the script work properly.

Step 3:

Replace The above Code With The Below Code.
<div id='jobmiddlenew'> 
<data:post.body/> </div> 
<b:if cond='data:blog.pageType == &quot;item&quot;'> 
<style> #addcodemiddle{display: none;} </style> 
<div id='addcodemiddle'> Place Your Ad Code Here </div> 
<script type='text/javascript'> var str1=document.getElementById(&quot;jobmiddlenew&quot;).innerHTML; var str2=str1.length; var str3=str2/2; var substr = str1.substring(str3, str2); var n = substr.search(&quot;&lt;br&gt;&quot;); if(n&lt;0) { n = substr.indexOf('.'); if(n&lt;0) { n=0; } var firsthalf = str1.substring(0, str3+n+1); var secondhalf = str1.substring(str3+n+1, str2); } else { var firsthalf = str1.substring(0, str3+n+4); var secondhalf = str1.substring(str3+n+4, str2); } var addcode=&quot;<center>&quot;+document.getElementById(&quot;addcodemiddle&quot;).innerHTML+&quot;</center><br/>&quot;; var newbody=firsthalf+addcode+secondhalf; var strnew=document.getElementsByClassName(&quot;post-body entry-content&quot;); strnew[0].innerHTML=newbody; document.getElementById(&quot;addcodemiddle&quot;).innerHTML=&quot;&quot;; </script> 
</b:if>

Step 4

Replace The Place Your Ad Code Text With Your Adsense Ad Code in the above code and save your template.
If you are facing any kind of issue then do let us know in your comments. Happy Blogging Cheers 🙂