Blogging has become a very common pass-time for casual web users, as well as a staple for internet businesses. The internet is filled with millions of blogs, most of them, of course, using either Wordpress, Blogger or Tumblr. Designing a blog from scratch using any of these blogging platforms requires extensive knowledge of coding and countless hours of debugging. There is an easier and more efficient alternative though.
Webydo, a popular online designing platform for professional web designers, recently introduced a new feature which will definitely please blog designers – Articles.
Using Articles, an entire blog can be designed without having to handle a single line of code!
Below, we explain how to use Articles to build a blog with Webydo.
If you missed past posts about other features of Webydo, please find them here:
How to Create a Contact Form
Designing a Navigation Menu with Webydo
Signup for Free Updates:
Please take a moment to subscribe. Your email will never be shared with anyone!
Login to Webydo, or create a new free account if you haven’t signed up before. Create a new site, and choose the Blank format.
There are already 4 pages included in your blank website – Home, About Us, Gallery and Contact Us. For our blog, we will first create a new page. Go to Pages at the top, and click the New Page button. In the Page Settings of the new page, rename the page to Blog.
Of course, if you just want to use Webydo to create a blog, there is no need of creating a new page. Use the Home page for your blog.
Setting up Articles Drag the Articles element to the canvas area. This can be moved by dragging or resized by dragging the corners.
The articles element already includes 5 articles by default, 4 on a page. Each article contains a title, date, publisher, image placeholder, text box and a Read more link.

The panel at the top has settings for the whole blog. We will cover each of these separately.
Manage – Click the Manage button to see a list of articles. Posts can be reordered or deleted here.
Width and Height – This is the dimensions of the entire blog container. Adjust this here, or by dragging the corners of the container.
Add New Article – Clicking this adds a new default article section, which the blog owner can fill in with their own content.
Total Items – This is the total number of posts on the blog.
Columns – There is just one column by default, but this number can be increased by clicking the up arrow. This can be useful for creating a Pinterest style blog, for example.
Webydo, a popular online designing platform for professional web designers, recently introduced a new feature which will definitely please blog designers – Articles.
Using Articles, an entire blog can be designed without having to handle a single line of code!
Below, we explain how to use Articles to build a blog with Webydo.
If you missed past posts about other features of Webydo, please find them here:
How to Create a Contact Form
Designing a Navigation Menu with Webydo
Signup for Free Updates:
Please take a moment to subscribe. Your email will never be shared with anyone!
Login to Webydo, or create a new free account if you haven’t signed up before. Create a new site, and choose the Blank format.
There are already 4 pages included in your blank website – Home, About Us, Gallery and Contact Us. For our blog, we will first create a new page. Go to Pages at the top, and click the New Page button. In the Page Settings of the new page, rename the page to Blog.
Of course, if you just want to use Webydo to create a blog, there is no need of creating a new page. Use the Home page for your blog.
Setting up Articles
Drag the Articles element to the canvas area. This can be moved by dragging or resized by dragging the corners. The articles element already includes 5 articles by default, 4 on a page. Each article contains a title, date, publisher, image placeholder, text box and a Read more link.
The panel at the top has settings for the whole blog. We will cover each of these separately.
Manage – Click the Manage button to see a list of articles. Posts can be reordered or deleted here.
Width and Height – This is the dimensions of the entire blog container. Adjust this here, or by dragging the corners of the container.
Add New Article – Clicking this adds a new default article section, which the blog owner can fill in with their own content.
Total Items – This is the total number of posts on the blog.
Columns – There is just one column by default, but this number can be increased by clicking the up arrow. This can be useful for creating a Pinterest style blog, for example.
Max Posts Per Page – Include as many posts as you want on one page. 4 is the default here.
Pagination – Pagination is the organization of pages in an easily navigable menu. The pagination automatically appears at the bottom.
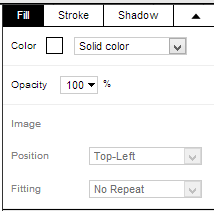
Designing the blog – Use the properties panel on the right to easily design any part of the blog. Add color, opacity, images, stroke and shadows using this panel.
Adding content to your blog

One editable article is here by default. To add more, click the New Article link. The blog can be edited in either the Design or Content view.
Click each area, and add your own title, date, image, name, content and read more link. The read more link will of course link to a separate page containing the full article.
Webydo Collection
The collection feature is set up very similar to Articles. This can be used when listing several products, have post previews in Pinterest style, or even as an image gallery.
What do you think of Webydo’s new Articles feature? If you would see more added to the blogging capability, why not suggest it.
Go to Webydo, and click the Participate link at the top. Here you can suggest new features, or vote on already suggested ones.
To learn more about Webydo, please visit these articles:
Pagination – Pagination is the organization of pages in an easily navigable menu. The pagination automatically appears at the bottom.
Designing the blog – Use the properties panel on the right to easily design any part of the blog. Add color, opacity, images, stroke and shadows using this panel.
Adding content to your blog
One editable article is here by default. To add more, click the New Article link. The blog can be edited in either the Design or Content view.
Click each area, and add your own title, date, image, name, content and read more link. The read more link will of course link to a separate page containing the full article.
Webydo Collection
The collection feature is set up very similar to Articles. This can be used when listing several products, have post previews in Pinterest style, or even as an image gallery.
What do you think of Webydo’s new Articles feature? If you would see more added to the blogging capability, why not suggest it.
Go to Webydo, and click the Participate link at the top. Here you can suggest new features, or vote on already suggested ones.
To learn more about Webydo, please visit these articles:
0 comments:
Post a Comment