If you are a senior official in your office and want to keep tabs on your employees, but you don’t want to walk down several aisles or floors to get to their computer, do not worry! Windows has a solution for this: Remote Desktop Connection. With Remote Desktop Connection, you can remotely access your employee’s computer (i.e., the host computer) from your PC (i.e., the client computer). Just configure a few network settings, and you’re good to go!


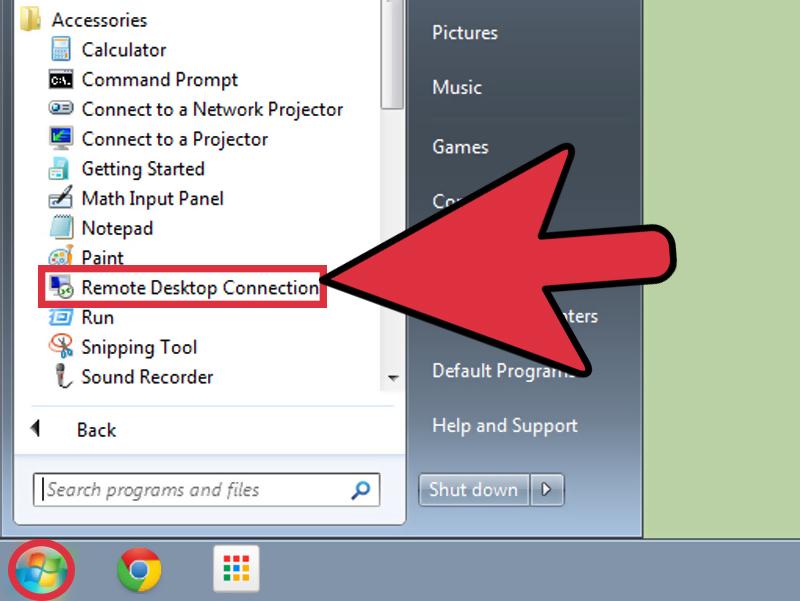
1. Access Remote Desktop Connection. Open the Start menu and click on “All Programs.” Select the Accessories folder in the list of options displayed, then click on “Remote Desktop Connection.” A dialog box will appear.

2. Type the name of the computer you want to connect to in the textbox. If you don’t know the name of the computer, you can choose the computer among the list of available ones in the network by clicking on the drop-down menu.

3. Click the “Options” button located at the bottom left corner of the dialog box. A new dialog box will open with a list of tabs at the top. Click on the “Display” tab to modify the size of the remote desktop. This can be done by dragging the pointer under the title “Display Configurations” to increase or decrease the size of the remote desktop.

4. Click the “Local Resources” tab next to the “Display” tab. Under the title “Local devices and resources,” check the boxes next to “Printers” and “Clipboard.” Here, you can access the printers and clipboard of your client system while working in the remote desktop (i.e., the host system).

5. Choose the local drives to access in the client system. Click the “More” button present to the left side of the two checkboxes to choose the local devices (drives) you will access in the client system while using the remotely controlled host system.

- Check the appropriate checkboxes under the “Drives” that you want to use then click “OK.” The previous screen under “Local devices and resources” will appear.

6. Click the “Experience” tab. Change the connection speed between your client system and the host computer by clicking on the drop-down menu and choosing the appropriate connection.

- Check the checkbox in the bottom left corner of the screen to reconnect automatically if connection is disrupted.

7. Click the “Connect” button located in the bottom right corner of the dialog box. A message will come up asking for a confirmation to connect. Click the “Connect” button located in the bottom right edge of the message, and a Windows Security dialog box will appear asking for your username and password.

8. Enter the username and password that is registered in the host computer. Click the “OK” button in the bottom right corner of the screen to proceed. (make sure the host computer is password protected on particular username you want to log in to. it is hard to connect to non-password username)
- It can take up to several minutes to get connected to the host system.

0 comments:
Post a Comment